Loudness measurement in sone (DIN 45631 ISO 532B)
In this article we cover the measurement of loudness for stationary (not fluctuating noise sources). We offer a turn-key solution for loudness measurement.
In our Webshop you will find many products with focus to audio measurements.
In addition to the simple ISO532B Zwicker method, we offer more complex time-variant loudness measurements and other psycho-acoustic parameters (Sharpness, roughness, tonality etc.).
Introduction
Sound can be described with various physical parameters e.g. intensity, pressure or energy. These parameters are very limited to describe the perception of the human ear. A first approach is to take into account that the ear is less sensitive at lower and higher frequencies. The research work around 1920 from Barkhausen result into the well known A,B,C weighting curves. The frequency response of the ear depends on the sound level, that is the reason for different curves, which are valid for a certain level only. A pure sine at lower levels e.g. 40dB(A) has the same subjective loudness over the complete frequency range. However, in practice sine tones are not very common. For complex sounds and noise, this simple model is not valid anymore.
In most sound pressure meters available today, you will find these techniques, because they are easily to derive from the physical parameters.
Loudness (Sone)
A wideband noise has a different subjective loudness than a pure tone at the same level measured in dB(A). Therefore, dB(A) is very limited in its usage although widely used. Zwicker analyzed various psychoacoustics effects thoroughly. A result was a model for the human hearing. A famous psychoacoustics effect is acoustical masking. A loud tone hides quiet tones. Nobody would expect to hear the sound of a mouse during a symphonic orchestra, although the mouse would audible in quiet phases. A very famous application of this and other effects are audio compression techniques like MP3. Only parts of the signal, which are audible according to a model, are stored.
Based on its countless hearing tests, Zwicker developed a model for loudness measured in sone. For stationary signals you will achieve much better results than the traditional dB(A). In contrast to dB(A) sone is a linear parameter. Two sone has double loudness compared to one sone. The reference level is one sone, which is equivalent to a tone with 1kHz at a level of 40dB.
As mentioned previously, sone is valid for stationary signals only. It is ideally in the judgment of air conditioners or typical PC noise like hard disks of fans.
This measurement describes the subjective loudness. However, it does not allow distinguishing between nice or annoying tones. Most people will agree that the sound of a flute is much nicer than a drill used by dentist although they both might have the same loudness.
The measurement of the loudness is based on the 1/3 octave analyzer. In addition, you have to calibrate the system. All psycho acoustic analysis requires absolute sound levels. This can be achieved with a sound calibrator.
A complete measurement system with Akulap for sone contains the following components:
· PC/Laptop running Microsoft Windows
· Akulap module „Sone/Loudness“
· Measurement microphone
· Sound-level calibrator
· Tripod
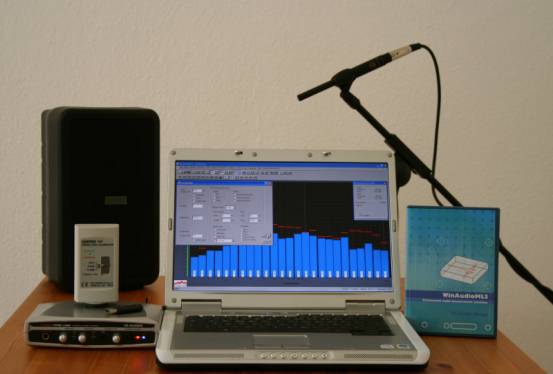
(A loudspeaker is not required for sone measurement)

Akulap with Sone/Loudness measurement. All values are displayed in real-time.
|
Situation |
Sound
pressure p |
Sound
pressure Lp |
Loudness |
|
Pain
threshold |
100
Pa |
134
dB |
~
676 sone |
|
Hearing
damage |
20
Pa |
>120
dB |
~
250 sone |
|
Jet
engine |
6,3
- 200 Pa |
110
- 140 dB |
~
125 - 1024 sone |
|
Pneumatic
hammer, |
2
Pa |
~
100 dB |
~
60 sone |
|
Hearing
damage |
0,63
Pa |
>90
dB |
~
32 sone |
|
Main
road at 10m |
0,2
- 0,63 Pa |
80
- 90 dB |
~
16 - 32 sone |
|
Car
at 10m |
0,02
- 0,2 Pa |
60
- 80 dB |
~
4 - 16 sone |
|
TV
at 1m |
0,02
Pa |
~
60
dB |
~
4 sone |
|
Normal
conversation |
2
· 10-3 - 6,3 · 10-3 Pa |
40
- 50 dB |
~
1 - 2 sone |
|
Quiet
room |
2
· 10-4 - 6,3 · 10-4 Pa |
20
- 30 dB |
~
0,15 - 0,4 sone |
|
Silent
breathing |
6,3
· 10-5 Pa |
10
dB |
~
0,02 sone |
|
Hearing
threshold |
2
· 10-5 Pa |
0
dB |
0
sone |
Measurement with low noise devices
Many sone measurements include analysis of low noise devices (e.g. beamer, notebooks etc.). The normal measurement distance is 1m. You can only perform a reliable measurement if the signal level is above the noise. The noise includes acoustic noise from the environment and noise in the measurement chain from the microphone or preamplifier. In a normal office environment at a quiet noise level of 45dBA it is impossible to analyze a fan with 25dBA. Since the human ear is very sensitive, such measurements require high quality measurement equipment.
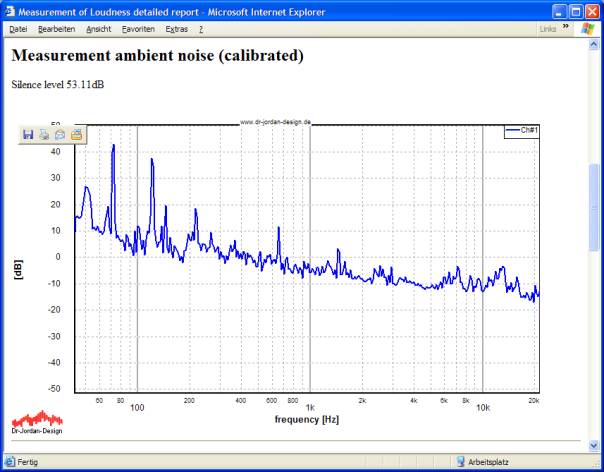
For every measurement, we strongly recommend to measure the quiet noise first. Simply switch off the measurement device. The optimum measurement environment is a special anechoic chamber, which reduces reflections and noise from outside. We strongly recommend switching off noise sources if possible (windows, air-condition, computers etc.)
Many measurement microphones have a self-noise of 30dB(A), which defines the lower bound for measurements. You can improve the measurement sensitivity by reducing the measurement distance from 1m to e.g. 25cm. This increases the signal level by 12dB. This offset can be corrected with a different calibration factor, which allows Akulap to show the measurements results with respect to 1m.
We will explain this with an example.
By reducing the distance to the half, the level increases by 6dB. With a distance of 25cm the correction factor is 12dB. If you use a sound level calibrator with 94dB, the reference level has to set to 82dB. A sound level of 82dB will be displayed as 94dB. This approximation is only valid in the far-field with spherical radiation. In the near-field you will encounter e.g. diffraction, which has significant influence on the signal level. Therefore, we strongly recommend documenting this different measurement distance clearly, because it is difficult to compare different measurement distances.
Procedure
With Akulap you can perform a loudness measurement either automatically or manually.
With the automatic measurement many
parameters are checked for plausibility to reduce possible sources of error. In
addition, you can enter a reduced measurement distance directly.
We recommend using the manual measurement, if the setup is already verified and
optimized and you need a quick measurement. In case you do not use a sound level
calibrator, the manual mode is required.
Automatic measurement
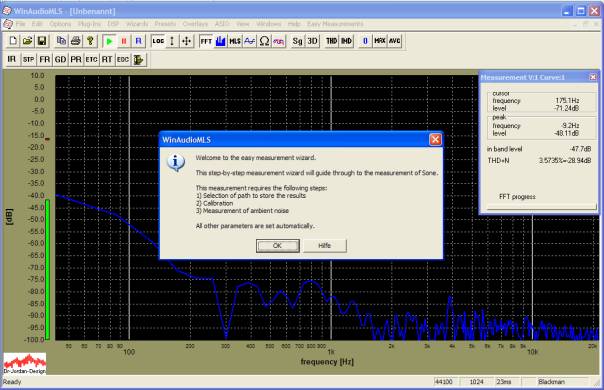
The automatic measurement wizard guides you through all steps. The final results are stored in a comprehensive report.
Start the measurement with Easy Measurements->Sone/Loudness from the menu.
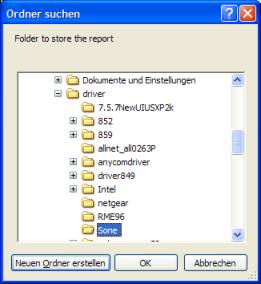
Select a folder, where the results will be stored.
Connect the calibrator to the microphone and switch it on.

In this picture you can clearly see
the frequency of the calibrator (in this case 1000Hz).
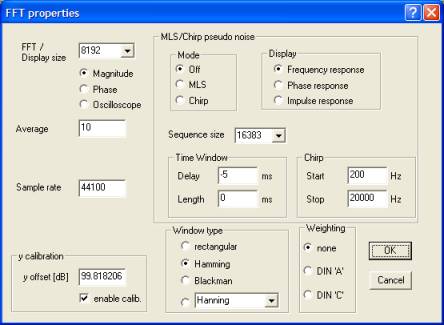
In the next step you have to adjust the gain of the pre-amplifier. If the gain
is too high, the measurement chain is overloaded, which results in distortion.
If the gain is to low, the noise level increases.
Akulap helps you to find the optimum settings. It displays both the input level (RMS) and the distortion (THD+N) with parameter viewers. If both parameters are within their limits, they convert to green.
Enter the reference level of the calibrator, normally this is 94dB.
All measurement values are display in absolute values. Do not change the gain settings anymore.
In the next step enter the measurement distance. All results are converted to a reference distance of 1m.
By using the automatic measurement, Akulap automatically measures the quiet noise. This ensures that the signal level is significantly above the quiet level. Switch off the calibrator, any noise sources and the device under test.
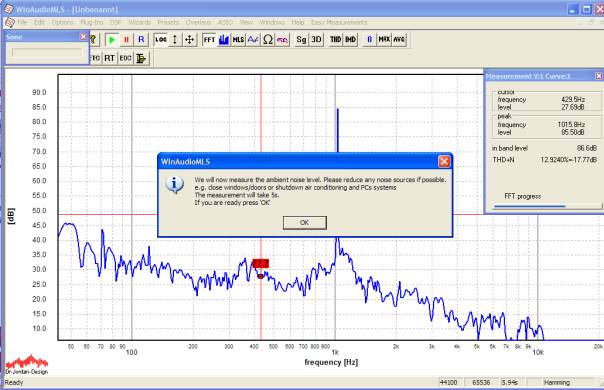
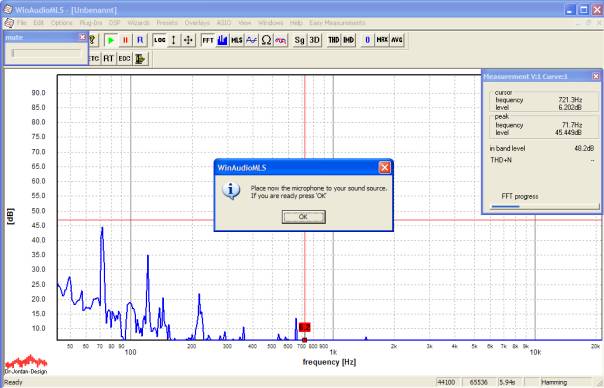
In the final step switch on the device under test and confirm it in the dialog box.
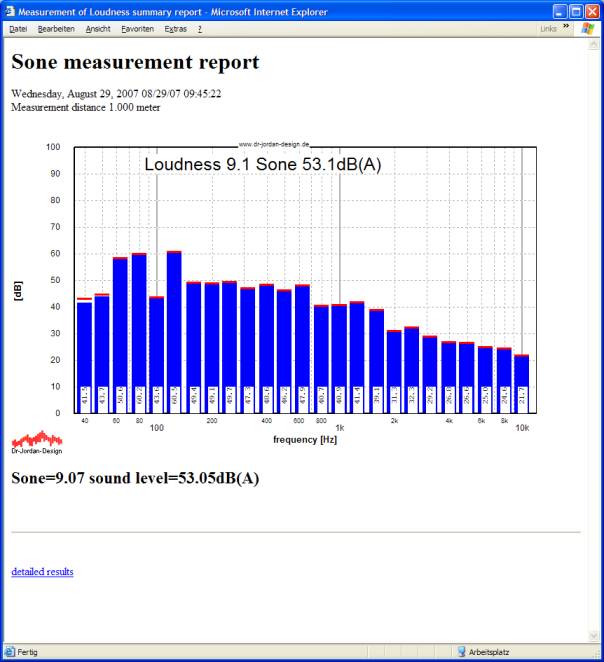
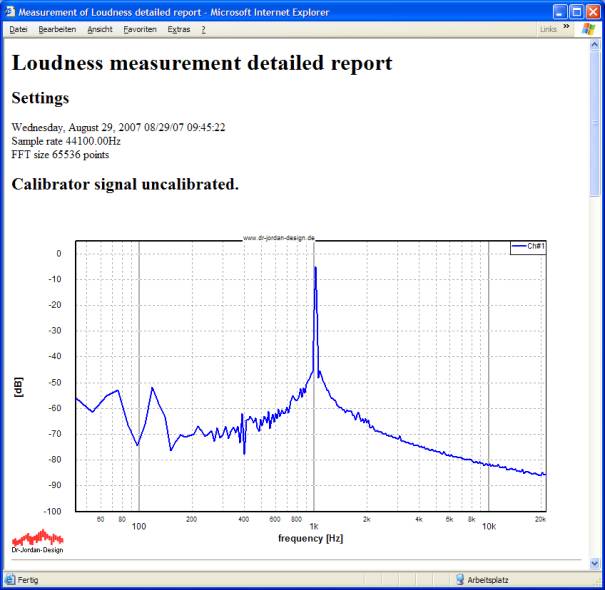
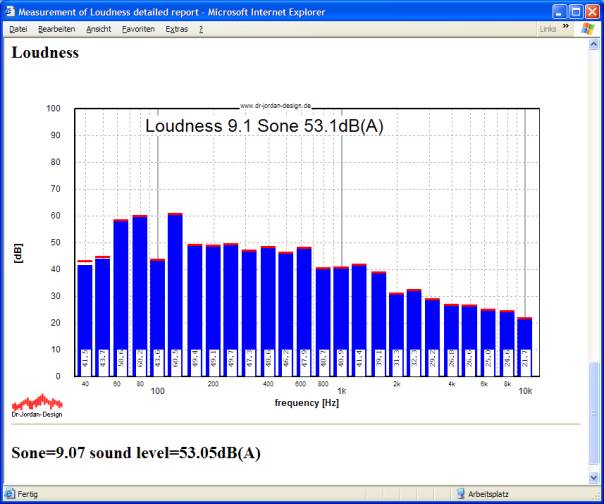
All measurement results are written to a HTML-report. You can view it with any browser, print it or convert it to PDF. If the measurement has finished, your default browser will open the report automatically.
The following screenshots show an example of such report.
Manual measurement
For a manual measurement you have to perform the following steps
· Start the 1/3-octave RTA
· Activate the sone measurement
· Weighting should be switched off
· Calibrate the display to measure absolute levels.
· First, measure the quiet noise.
· Finally, apply the measurement microphone to the device under test.
Start Akulap with its default settings and activate the sone measurement with plugins->loudness (Sone) from the menu.
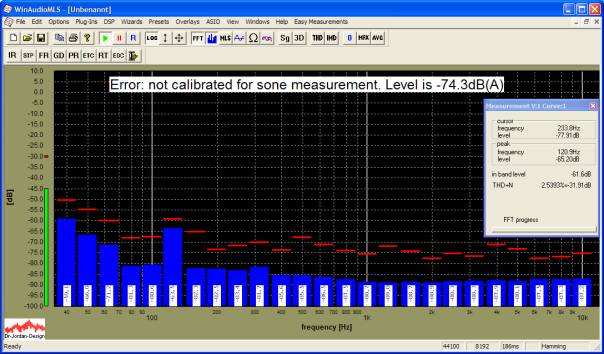
The picture shows the uncalibrated quiet noise.
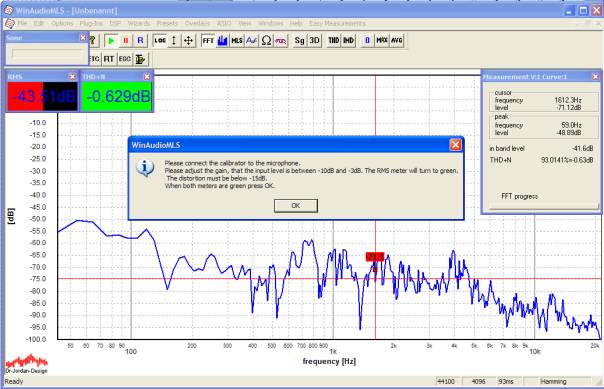
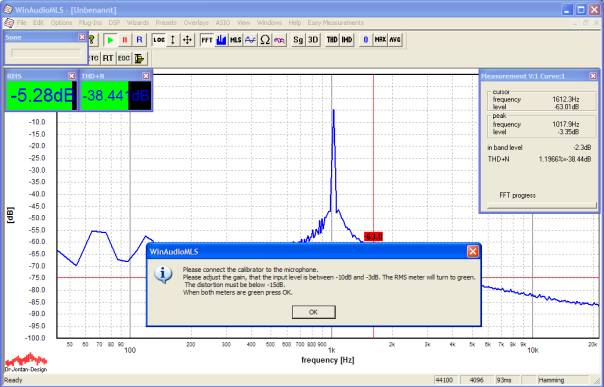
In the next step connect the calibrator to the microphone.

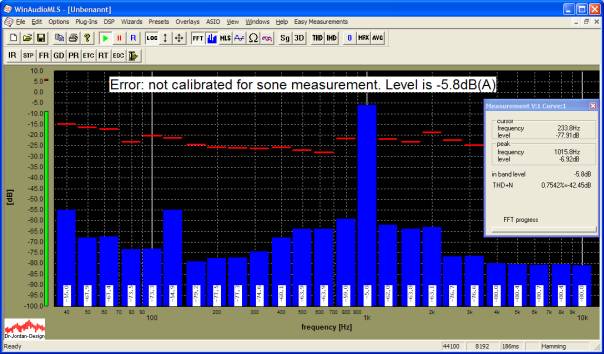
Please pay attention that the level is between –10dB and –5dB. If this is not the case, please change the gain settings of the microphone. Distortion and noise (THD+N) should be less than –15dB
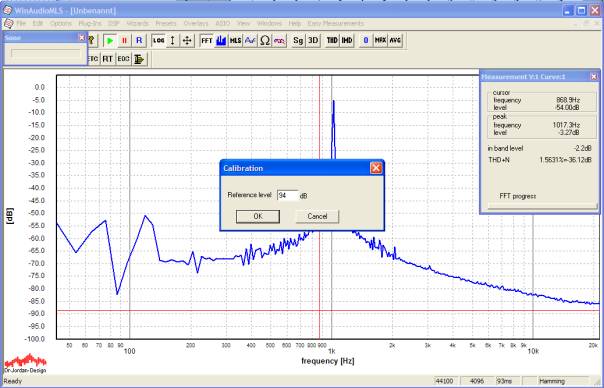
Start the calibration with Wizards->Quick calibration
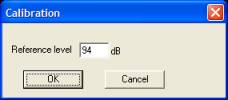
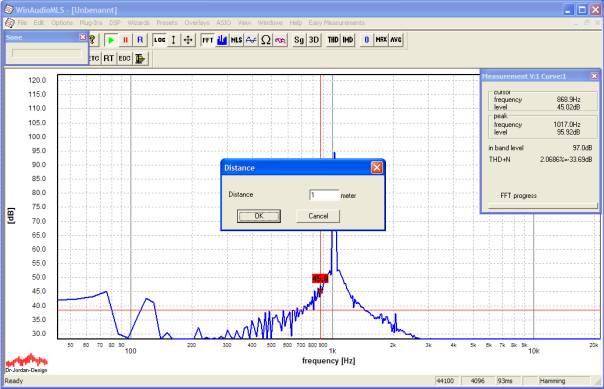
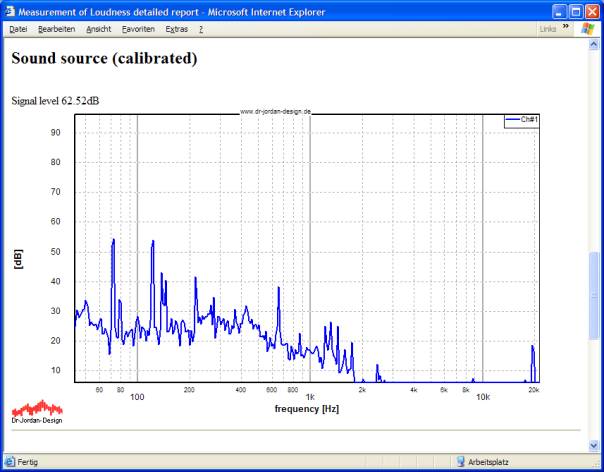
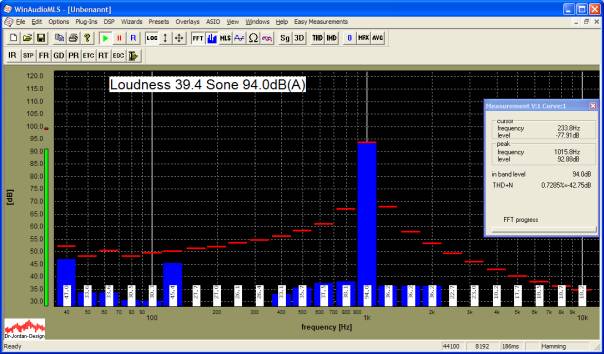
The display shows now the calibrated reference signal with 94dB.
Place the microphone to the device under test. The default measurement distance is 1m. Please ensure, that the signal level is significantly above the noise level.
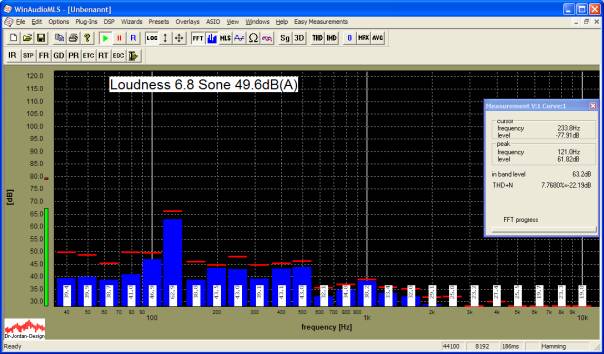
If the signal shows strong fluctuations, you can apply averaging. In the following example, we average over 10 blocks, which is equivalent to a time interval of 1.8s